Thursday, July 26, 2007

Tutorial: White cards in a snap (Brazil2 Utility Material)

Hi all.
In this very simple tutorial we'll use the Brazil2 Utility Material to make White cards for true, HDRI-like reflected highlights.

Download the scene here (Max 9.0 32bit)

It's a simple scene:

The scene is ready to be rendered. Hit render and see what comes out:

I used three kind of materials here: a simple white-ish for the walls, B2 Car Paint with reflection at 100% for the hoses and the lumpy torus knot, and black and white "glazed pottery"-like materials (with settings based on this Neil Blevins tutorial - if you know what's good for you, better you read all his cg education section!) for the teapots and the other two black and white thingies there.

Notice that Car Paint material (Brazil 2 Advanced material - Base shader - Car Paint) got fresnel reflections by default.
The other reflective materials use a fresnel falloff map in the reflection slot, with IOR turned up to 2.5.

Ok, let's have a look at the rendering: I disabled the "specular" part of the area light, so the highlights will be generated only by raytraced reflections. The light intensity would suggest some stronger highlights there...

I placed a thin box with width and height based on the area light size, right behind the light (named "whitecard"). Open the material editor and locate the "Whitecard_1" material - that's the material i applied on the whitecard. A diffuse white color, nothing else.
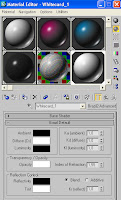
Just turn "Luminosity" to pure white, and render again:
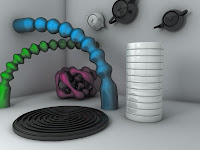

Better, but highlights are still not that strong - even if luminosity has been boosted up to it's maximum value. Why the highlights aren't that strong then? Well, in real life there's no 255/255/255 limit... so, the diffuse part of the materials will always subtract a few brightness from the reflection. Only a Chrome material would keep the white card brightness - but a Chrome material doesn't have a diffuse component. So, a simple workaround would be raising the Kl index to boost up the luminosity, over the RGB values limit:
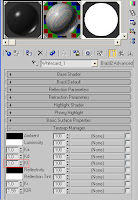
Note that there are a bunch of ways to increase the output value of a material, to let it be "brighter" then pure RGB white value - this is just one of them.
Try to raise the Kl value to 10 and render again:
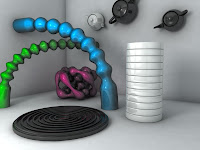
Ooops. Highlights are there, nice and strong enough, but the scene is much more lit and some noise appeared on the walls. Why?
Well, objects with self-emitting materials will generate, by default, GI (if GI is on, obviously). This could be annoying, because a) white cards will modify the lighting setup you had decided for, and b) to remove the noise, you'll have to tweak a few settings that will probably slow down the rendering, like increasing the QMC value.

There's a quick and simple workaround: wrap the whitecard's material in a Brazil2 Utility Material, and set the latter to inhibit the material from emitting indirect GI lighting.
Just click on the "Brazil2 Advanced" labeled button. The Material/Map Browser will pop up. Double click on "Brazil2 Utility Material", and when asked choose "keep old material as sub-material".
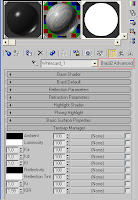
Our Whitecard_1 material has been put on the "Base" slot of the B2 utility material. Ok, a few more steps and we'll be done:
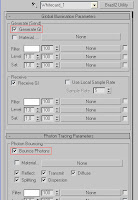
Just disable the "Generate GI" and "Bounce Photons" slots, and render the scene again:
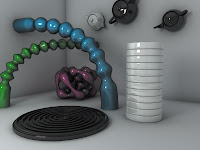

Ok, now we're back at the original lighting setup (very first rendering), but now we got our highlights!

Ok, let's see another situation: keeping the highlights without the "pure white" aspect of the white card object. Download another version of the scene, Whitecards_neons.zip.

Hit render. Here's the result:
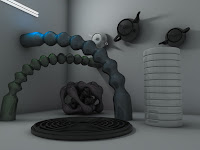
Ok, my goal here is to keep the "neons" look - bright, but not pure white, so they can have some reflection on them - while having strong highlights on the objects. Just boosting up the Kl spinner wouldn't help us - the neons would become totally white.
So, that's how I do in those situations: just wrap the "Neons" material in a B2 Utility Material. Then, as before, disable GI emission and Photon bouncing to avoid noise and unwanted lighting changes.
For the highlights, this time we'll use the Utility Material "Reflected" slot.
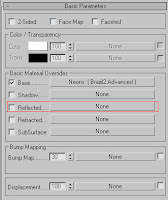
The idea is simple and powerful: the material that will be placed on that slot will be the one "seen" by the reflections.
So, let's proceed this way: copy (not instance, copy!) the Neon material from the "Base" to the "Reflected" slot. Then, raise up to 10 the Kl of the new, copied material. You're done!
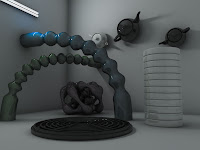
Have a look at the "walls" material too. I used the B2 Utility Material to increase the QMC samples received by the walls (to smooth and improve the aspect of the bounced light - for example the one from the blue hose - without sacrificing the render time). Another use for the Utility Material... now, that's why it's been called like that!
Orientation: B2 in the Command Panel

Command Panel

The Command Panel in 3ds Max contains several user-interface panels that give you access to most of the modeling features of 3ds Max, as well as some animation features, display choices, and miscellaneous utilities. This is where you create and modify Brazil specific objects, cameras, and lights.

At this point in the training material we're just concerned with quickly familiarizing ourselves with where these new objects are located in the user interface. We will get into details on creating, modifying, and rendering with all these new tools in future lessons.

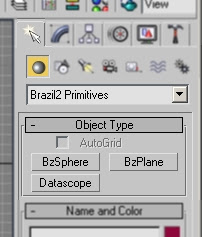
Create Panel: The Brazil2 Primitives

  1. Click the Create Tab in the Command Panel
  2. If it's not already selected, click the Geometry Button
  3. In the dropdown list, select "Brazil2 Primitives"

These are the Brazil specific objects that are installed with Brazil r/s. For now we'll just do a quick overview of what these objects are:

BzSphere is a mathematically defined, mathematically perfect sphere object that, when rendered with Brazil, isn't made of vertexes and faces, like normal 3ds Max geometry. When this sphere is rendered, it takes very little memory and will never have visible vertexes or geometric edges, no matter how close the camera approaches it.

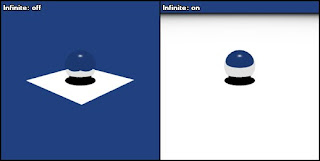
BzPlane is a mathematically defined flat plane. It can be bounded so that it has a specific size or it can be rendered as an "infinite plane" that will extend all the way out to your scene's horizon. This object also has none of the typical 3ds Max face/vertex construction -- it's just a mathematical surface.

Note: BzPlane replaces the CSG plane that was available via the render dialog in Brazil 1. BzPlane is more versitile in that it can be bounded, you can create several of them if you wish, and you can orient/align the plane any way you wish


BzPlane as an infinite plane

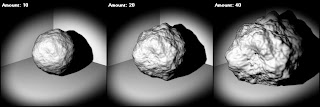
Both BzSphere and BzPlane have built-in support for displacements. Displacement mapping is a technique that can by used to modify the shape, or geometry, of the surface of an object using textures or bitmaps.


Displaced BzSphere

Datascope is an analysis/setup tool that we will be using when we get to a future section on lighting with photons.

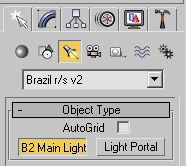
Create Panel: The Brazil2 Lights

  1. In the Create Panel ("Create Panel" is what we call the Command Panel when the Create Tab is Selected), click the Lights button
  2. In the dropdown list, select "Brazil r/s V2"

These buttons will allow you to create Brazil specific lights and set up Light Portals (We will deal with light portals when we get to rendering optimizations).

The B2Main Light is actually several different light types all built into a single, modular object. If you're familiar with 3ds max, then you know that Max has several different light types to choose from: Target Spot, Free Spot, etc. Using the B2Main Light you can create all those lights by just using different Creation Methods. We will cover creation methods and other features in a future section. For now, our goal is just to show you where these things are found.

Tip: By "Creation Methods", we are referring to how you use the mouse when you create the light. Do you just click? click-drag? double-click? etc. Different Creation Method sequences will create different types of B2Main Lights.


Just a few examples of Brazil2 Light types

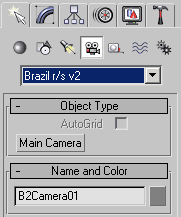
Create Panel: The Brazil2 Camera

  1. In the Create Panel, click the Cameras Button.
  2. In the dropdown list, select "Brazil r/s V2".

This Button creates the Brazil Main Camera. The type of camera you create (Free or Target) is also controlled here by Creation Methods, rather than multiple button choices. The Main Camera is where you set up camera specific Brazil r/s features, like lenses and Depth of Field.


The Brazil Main Camera in the 3ds max UI

Modify Panel: The Brazil2 Modifier

To find the Brazil2 Modifier, you need to have some selected geometry in your scene, so lets do a quick step by step so that we can see where to find this modifier:

  1. In the Create Panel, click the Geometry Button.
  2. In the dropdown list, select Standard Primitives.
  3. click GeoSphere -- the button will turn yellow
  4. In the perspective viewport, click the center of the viewport and drag out your Geosphere.
  5. Go Back to the Command Panel, and click the Modify Tab (aka the "Modifier Panel")
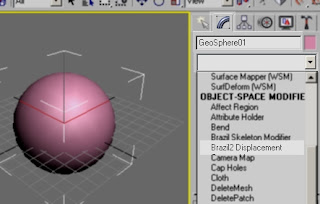
  6. Click the Modifier List dropdown, and select "Brazil2 Displacement" under the OBJECT-SPACE MODIFIERS section.

This is the Brazil 2 Displacement Modifier. You will use this when we get to applying displacements to arbitrary mesh-based geometry.

Friday, July 20, 2007

Travelweek


Business meetings and travel next week, so I'll be out until next Thursday. After that, the AO/LightBaking Tutorial and more of the Field-Guide (Next: Command Panel). In the meantime, it looks like there's a new B2Utility Material tutorial in the works.

Image: Frantic Films/Superman Returns

Monday, July 16, 2007

Tutorial: "Teapot" Interior GI with Photons - Part 1

Some time ago, since i was learning how to use Brazil 2.0 and discovering the differences with Brazil 1.x, i had a look at this tutorial (by Cecofuli - www.treddi.com, in italian). The scene is well known (i'm sorry but i couldn't find the original author), and i thought it was a good test for experimenting with B2.
I wanted to reach a result like this (rendered in Maxwell):


(image by Cecofuli - www.treddi.com)

Ok, let's start with the basic scene.
(3dsmax 9.0, 32 bit. If you haven't 3dsmax 9.0 i uploaded the .obj version of the scene)

Please, note that, since i don't own Maxwell, i had to rebuild the scene from the .obj file version of the scene (using the geometric "dummies" placed at the sun and camera places to recreate them in B2 format). So things aren't perfectly the same...
Units are in centimeters. Please adopt the file unit, to follow precisely the tutorial.
As you can see opening the file, i kept things simple. A very basic material for the walls (B2 advanced material, diffuse color 245/245/245) and a red one for the big teapot (B2 advanced material, diffuse color 174/0/0).

Let's start analyzing the original rendering. First thing i wanted to replicate was the "sun" color and the skylight color.
Using Photoshop's eyedropper i picked up a few sample colors, and in the end I decided to go for 240/230/180 for the "sun" light color, and 80/90/170 for the skylight (we'll talk about the skylight in a bit, now just remember the rgb value).
So, let's do the basic setup for the "sun" (in the scene, "b2 main light 01").
To simulate the original lighting I did those steps:
  • changed the light color to the "sun" rgb value i decided before.
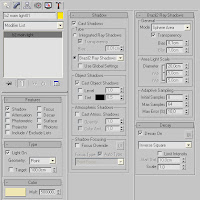
  • turned on "shadow" under the light features panel, and switched the shadow type from "Integrated Ray Shadows" to "Brazil2 Ray Shadows".
  • Turned on Decay, "Inverse square", Scale 1,0. Boosted the multiplier up to 500.000.
  • under the "Brazil2 Ray Shadows" panel, i picked up the "Sphere Area" mode, 20 Cm diameter.
Note that i've used "sphere area" shadow type because, in the .obj scene, the sun was a low-poly sphere of 20 cm diameter. This because, as far as I've understood from the italian Cecofuli's tutorial, Maxwell uses self-emitting geometry as light sources.

I could've tried to emulate this behaviour with B2 - for example, using self-emitting material on a sphere and cranking up the qmc bounces and samples - but this was not my purpose.
My purpose was to reach the same original image quality/aspect, using all the B2 features needed to reach the goal, with the lowest render time possible.

Ok, let's hit "Render".

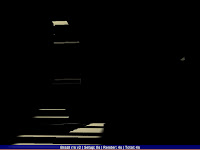
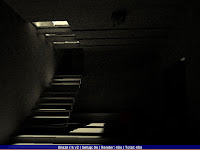
Nothing more then expected. There is no GI-light bouncing at this stage, so the output is almost all black, except where the light hits directly.
You can see that edges are jagged: don't worry about it, it's just the AA sampler's default value (0/0). Let's keep it this way for a few: experimenting will be much faster, while keeping a good approximation of the final look.
Now, the first GI test. Just turn on "Global Illumination":

Here's the result. Render time bumped up, but light starts bouncing...

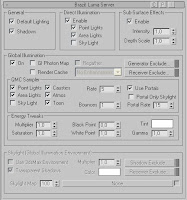
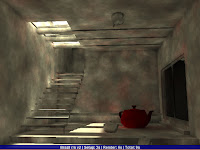
Ok, we need more light in there. First thing I do at this step is start up playing with photons. Just activate them in the light, under the "features" panel, and check "GI Photon Map" in the luma server rollout. Hit render again:

Much better. Light quantity is a lot more, even if the walls look like camouflage...

Since we're aiming for a detailed rendering, let's fine-tune the photon map.


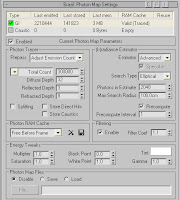
I changed the Total count of photons up to 300.000, Search type to elliptical (slower, but better on corners), Photons in estimate to 2048, Precompute to 1. I also turned on the Filtering, to smooth out the photon map. Notice that a precompute value of 1 is very low if you plan to use regathering (and I do, for this rendering) - but, again, quality first. We could tweak it in a second time.

Settings for the photon map are kinda cranked up, but since the scene is relatively "easy" (just one light emitting photons, simple geometry) and since my goal was quality, i think is ok.

By the way, the calc time for the photon map was quite acceptable, and the result very smooth and detailed - for a photon solution that will be regathered, of course.

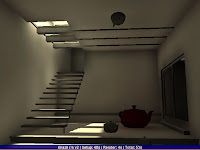
Ok, that's all for the first part. In the second part we'll add the skylight with the help of skylight Portals, and we'll complete the rendering with regathering and render cache. Stay tuned!

Thursday, July 12, 2007

Orientation: B2 in the Material Editor

Material Editor

Remember: when we get here, we already have Brazil 2.0 assigned as the current renderer and have turned off the Material Editor renderer lock. Review the previous section again if you need to get your environment set up before proceeding.

The Material Editor is where you set up, apply, and adjust the settings that define the surface of your objects. Brazil r/s supports 3ds Max compatible materials and textures as well as installing several new materials and textures that give access to Brazil r/s specific features.

Open the Material Editor

  1. From the Rendering menu, click Material Editor...
    The Material Editor Dialog opens. You navigate between different materials within the Material Editor by clicking on the different Sample Spheres shown in the top of the dialog.

Note: Please refer to the 3ds Max User Reference, "Material Editor, Materials and Maps" chapter for more information on the vast number of features and controls available within the material editor. The Material Editor makes extensive use of intuitive drag-and-drop, double-clicking, and tooltips, which can be a big help in quickly becoming familiar with material construction and design. For our purposes we will limit ourselves to a relatively small subset of features within the Material Editor.

Changing Materials and locating the Brazil2 Materials

  1. In the Material Editor Dialog, click the button that says, "Standard". This button is known within the 3ds Max documentation as the Type Button. This opens the Material/Map Browser Dialog.
    You use the Material/Map Browser Dialog to select new materials and textures for use in your scene. The materials that have names starting with " Brazil2" are Brazil r/s specific materials that will give you access to special Brazil r/s features.
  2. In the Material/Map Browser Dialog, double-click " Brazil2 Advanced Material"
    This creates a new Brazil Advanced Material that you can work with and assign to models in your scenes.
  3. Click the gray Swatch to the right of "Diffuse (Cs)" in the new material.
    Tip: "Diffuse" is a technical term for the color of an object. For example, if you were trying to model a piece of orange plastic, you would say, "the diffuse color of the object is orange."
  4. In the Color Selector Dialog, change the color to something like a bright red. The current Sample Sphere changes color to giving you a preview of what your current settings look like.
  5. Click the Type Button -- it is now displaying the text, "Brazil2 Advanced" -- to open the Material/Map Browser Dialog again.
  6. Double-click "Brazil2 Utility Material."
    This time you see the Replace Material Dialog. This happens because Brazil2 Utility Material can take another material as a sub-material -- the dialog is asking if you want to discard the Brazil2 Advanced Material that you started with, or if you wish to keep it as a sub-material in this new Brazil2 Utility Material.
  7. Click "OK" on the Replace Material Dialog to accept the default, "Keep old material" behavior.
    Note that the "Base" channel in the new Brazil2 Utility Material has your red Brazil2 Advanced Material already assigned to it.

Assigning Textures and locating the Brazil2 Textures

  1. In the Material Editor Dialog, click on the second sample sphere. Note that the interface below changes to show that you are now editing a *Standard Material"
  2. Open the Maps Rollout by clicking on the Rollout bar that says, "Maps."
  3. Click on Map Button to the right of "Diffuse Color".
    Note: the Material/Maps Browser Dialog opens, but this time it's showing you a list of Textures and Maps, not Materials. The new textures that are installed with Brazil r/s are listed with " Brazil2" in their names.
  4. Double-click to choose a Checker texture from the Materials/Maps Browser Dialog. Note that the sample sphere changes to show the colors of the new Checker texture map.
  5. Click the Go To Parent button in the Material Editor to get back to your standard material.
    Tip: In addition to the Go To Parent button, you can also use the Material/Map Navigator or the Material Name Field drop down list. It is always a good idea to rename your materials as you work to make future navigation easier.

Monday, July 2, 2007

Codedooty

I'm stuck doing some regular dev work for the next couple days... then it's july 4th here (holiday), so I may not be able to do anything new on the blog until later this week. I do have a couple new contributors signed up now, so perhaps something will get posted before I get back.

In case you've missed it, we got the max9/x64 version of B2 (Brazil r/s V2.0) out of testing last week, check the press release here. Thnx to all the blogs and news sites that have picked up the story.

[UPDATE 7-11] Apologies for the delay -- ran into a hard drive prob that set me back a couple days, then got slammed w/ more work. We do have one contributor that's got a tutorial almost ready to go and I've got the text for the next section of the training guide ready too (it still needs screen caps). I've also got another tutorial on deck that came in as a request yesterday.