Posted a month ago -- just ran across it on youtube.
Thursday, February 21, 2008
Tuesday, February 19, 2008
Caustics in Brazil r/s Tutorial Appendix
In this short Appendix to "Tutorial: Rendering Caustics in Brazil r/s" I will make a simple demonstration of how caustics are generated by different basic geometries. I hope that some of you will find it useful and also it will save you some time on your own projects. Scene settings are the same as in my caustics tutorial with the teapot. I also attempted to use different sizes and positions for the objects to show variations.
Standard Primitives
Extended Primitives


contributed by Pavel Romsy
![]()
Monday, February 11, 2008
Tutorial: Making of Lamborghini Gallerdo
 Here's a nice Brazil 1 tutorial by Simon Nutall (Iconized). It covers the whole look-dev process and includes the construction of the model, some good observations, and texturing and setting up the materials.
It's nearly a two years old, but something bumped it's rss feed so google alerts just picked it up yesterday.
![]()
Tuesday, February 5, 2008
A few speed tips and tricks: Glossy materials, Lot of lights
I usually do interior renderings. This means that I use a lot all the cpu-killing bells and whistles available: glossy materials, area shadows, ies lights, GI etc. I have to render at 4k size or even more, so, in order to keep rendertimes as low as possible, I've learned to use a few tips.
- Glossy materials
Almost every material, in real life, is both reflective and bumpy. Obviously some material's reflections and/or bumpyness are so slightly noticeable that you can reproduce their aspect with a lot of workarounds and tricks. B2 material's glossiness itself is a trick - a trick to visually render the material roughness without having to use a bump or displacement map.
In my scenes I use a lot of glossy materials, almost 80% of the scene objects. So optimization for me is a must.
B2 glossy reflection default values could be too high in a lot of situations. I usually tweak the adaptive sampling Max Error, 'till I reach a good quality/speed compromise.
Default is 0.01, if possible I rise it to 0.05 - 0.2 , depending on the scene.
- Lot of lights
Ever had a scene with lot of lights, maybe with area shadows? A scene setup like this can easily kill your machine - and your rendertimes. Luckily, there's room for speed improvements, without sacrificing quality.- Attenuation
Turn on "attenuation" in your B2 light's feature panel. Then scroll down to the attenuation panel. I usually keep the defaults ("cubic spline", "Far" attenuation only), then I tweak the "Far" ranges - usually I raise the "start" radius until the attenuation "sphere" intersects the floor, and a little bit more for the "end" radius.
Original scene by Robert Boothman. 39 B2 Ies Ligths with Area Shadows.
Then I do a sample rendering, to check if the rendering aspect is similar to the one without lights attenuation. Here's the result:
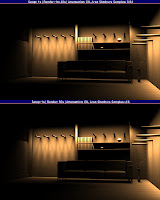
- Area Shadow Samples
I used B2 ray shadows set to disc area, and left all the default settings except for Disc Area Diameter. The area shadows min/max samples are, by default, 8/64. I've used very low settings instead, 4/8. In order to make a comparison between higher and lower area shadows samples, I added some cylinders on the walls, used B2 render pass to temporarily substitute the scene materials with a grey plastic, and raised the AA settings to 0/2. Here are the comparison images (I did also a closeup near the cyilinders):

- Attenuation


![]()
Subscribe to:
Comment Feed (RSS)

