Friday, December 4, 2009

Radial Brushed Metal Material

The Theory:

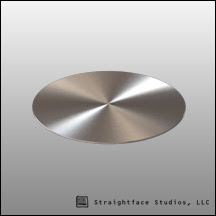
If you were to take the cross section of a brushed metal object you would find a series of small grooves etched into the object. You could attempt to simulate this using a very fine/high resolution bump map however the sampling rate required to eliminate aliasing would probably be prohibitive come render time.

In this shader we're going to use a blend material and surface normals to create a similar effect but much more rapidly than a brute force approach.

Instead of a series of small grooves we'll just have one material which simulates one side of a pyramid and a second for the opposite side. When blended together it'll give the impression that it's reflecting both directions simultaneously. By reducing the glossiness of the reflection we can also give the illusion of smoothing the grooves slightly.

In Practice:

Enough theory here is how to do it in Brazil. First let's start with 'one side' and then we'll instance all of our settings to the second material which will render the opposite angle.

1) Create a new Brazil2 Chrome material. We'll call it "Radial_Reflect_A".

2) In the Bump map slot we'll add a Gradient Ramp map. Go ahead and give it a name such as "Radial_Grad".

3) Under Gradient Type in the properties rollout select Radial. This will create the angled normal for one side of the pyramid.


[This step could also be replaced with a texture if you wanted to create overlapping brushed metal spots. The only important thing is to have a radial gradient of some sort.]

4) Back up at the B2 Chrome level: Enable Glossiness and choose "Phong" from the type rollout.

5) In the Focus map create an RGB Multiply map.
Give it a name such as "Refl_Gloss"
Set Color#1
to about 128 gray.

This will later let us instance the glossiness setting between the two materials.

6) Back up at the B2 Chrome level: Instance the Refl_Gloss map into the Specular Glossiness.

7) Create another RGB Multiply Map ("Spec_Level") in the Specular Level Map slot and set color #1 to white.

8) Create another RGB Multiply Map ("Refl_color") in the Specular Col. Channel.

9) Instance Refl_color into the reflection Filter map slot.

The first copy of the material is done. Next it'll just be a matter of creating its doppelganger.

10) Click the material type slot next to the materials name (Brazil2 Chrome) and choose Blend. When prompted be sure to choose "Keep old material as sub-material".


11) Set the Blend's Mix Amount to 50.0

12) Copy Radial_Reflect_A into slot #2 and rename it to something like "Radial_Reflect_B"

13) Go into your Radial Reflect B and change the Bump amount from 30 to -30.

14) The only thing left to do is Copy and Paste (instance) each map from Reflect A into the corresponding map slots in Reflect B. (Right click "Copy" on source. Right click "Paste (Instanced)" on destination map)

You can now adjust any of those maps and have them carry over to the opposite material automatically.


Tuesday, April 28, 2009

Facing glass panels in Brazil r/s V2

Real world examples:
Here are some photos of real world glass sculptures with facing panels.


Author: Vaclav Cigler

What options do we have?:
All testing will be done on simple scene with glass sculpture composed from 3 glass blocks. Material used is Brazil2 Glass material with enabled absorbtion (light blue).


Option 1 - Facing panels
At fist we can let the geometry as we have modeled it. Less work for us but causes artifacts from some angles due to Coincident Faces Crud.


Benefits: no need to modify model parts positions
Drawbacks: causes erros due to Coincident Faces Crud


Option 2 - Intersecting panels
What will happen if we will try to slightly intersect the panels? This will let us to get rid of artifacts and may look like right solution. But the refractions/reflections will be inacurate due to fact that in real world this can´t be done and we are making additional interractions.


Benefits: no errors from Coincident Faces Crud
Drawbacks: inacurate reflections/refractions

Option 3 - Gap between panels
In real world if the glass panels aren´t baked together there still remains some small gap filled with air/other interface (glue...etc.) between them. So when we offset the panels with leaving a small space between them we should get the right result by simulating this fenomen.


Benefits: no errors, acurate reflections/refractions
Drawbacks: moving with the model

I hope that this simple demonstration will help to those who has problems with this part of glass objects rendering. Any additional ideas or contributions are wellcome and I´ll add them into article.

Wednesday, December 3, 2008

Render trees fast!

Ever wondered why opacity mapped multi-layered trees were slow in rendering when using GI? Well here is a quick workaround on getting those trees to render about 4 or 5 times faster with full GI.The image below shows an opacity mapped tree with standard Max materials and full GI and area shadows.The image below shows the same tree with the same material, but with filtering set to none in the opacity bitmap. The tree shows much more detail which I like a lot more as the image above

So setting filtering to none in the opacity bitmap does little to nothing with the render time.There is a material that handles opacity in a much faster way. Its the B2 Utility material. So to speed up the render we want to use that Utility material in combination with the leaves material. For this you should use the Blend material, set up the way that is shown in the image below.The Utility material is setup as shown on the image below. If the leave patches needs a double sided material then click the 2-sided option. Set the Trans color to pure white.The leaves material is the original leaves material but without the opacity bitmap, shown below.

Finally we'll have to put the opacity bitmap in the Mask slot of the Blend Material. I've set the filtering to None.
If you hit render now it will render a lot faster.Have fun rendering....... faster......

edit: links to full size images now work....

edit2: In previous journeys of mine finding a faster render of that same tree I used to slap the whole material in a Utility material and then Use Local Sample Rate of 1.

So if you even want to speed things up more (ofcourse getting a lesser quality) you can put the blend material, or in my case a multi/sub, in a B2 Utility material and set that value to 1 as shown below.
Now the rendertime is even faster but at a cost of indirect shadows/light quality. This will work on trees far away from the camera though.

edit3: Pixel_Monkey found out that there was no GI in the tree, because of the way that the Blend material gets its properties from the sub-materials. So disabling the GI in the Utility material resulted in the whole Blend material not getting and sending any GI.

Rhino Tip - saving z-buffer data

This works differently than it does in the 3ds Max verion, and it just came up in the Rhino newsgroup, so I thought it was worth a mention here:

Question: Is there a way for Brazil to make an output of a depth map to use it with
DOF pro?

Answer: Once you've rendered, switch to "Z buffer" mode in the render window. You
can now press the "Save" button to save it.

Thursday, November 20, 2008

Brazil Materials DVD - From Gnomon


From Sebastien Chort (aka Zeb), and produced by Gnomon.

Here's some sample images [1][2], and some sample materials [1][2][3][4][5]!

I haven't seen the dvd yet, but it looks cool and it sounds like the included material library alone is well worth the cost -- 100 materials and 150 tileable textures.

.... And in other news: The BlurBeta plugins for 3ds Max 2009 are posted up at SplutterFish.com!!!

Friday, October 31, 2008

Happy Halloween from SplutterFish - BOO

Double, double toil and trouble; Fire burn, and cauldron bubble.

A new look at SplutterFish.com and 25% of off Brazil by using the coupon-code, "BOO" !

Also -- Free training videos from MentalBoutMax and SplutterFish, available here.

Monday, October 20, 2008

New Tutorial -- Render-Cache with Auto Occlusion


New Brazil tutorial From McNeel.com -- This one's Rhino specific, but the same principles apply to Brazil in 3ds Max. This well written tutorial does a nice high-level job of covering how Auto Occlusion works.