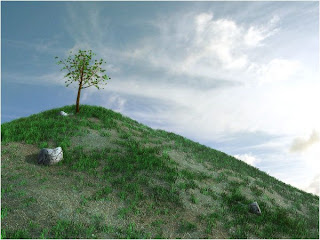
...What options do we currently have?
For those who are doing ArchViz in Brazil 2, this is a common question. I have seen some nice work using displaced grasses in other renders, so I decided to spend some time exploring different techniques for getting similar results using the currently available versions of Brazil.
Within Brazil r/s, there are two different ways to make displaced grass:
- First approach: Use B2 primitives (sphere & plane), which have good looking, reliable displacements built-in.
Benefits: fast, no errors, nicely looking
Drawbacks: only works on sphere and plane geometry
- Second Approach: Use B2 displacement modifier and apply it to any arbitrary geometry.
Benefits: arbitrary surfaces, more control
Drawbacks: Beta feature, thus not finished and prone to bugs when combined with various other features.
My displacement settings
Currently I build 2 basic types of grass via B2 displacement.
- English lawn
Settings are pretty simple :) I have used my material from the SF Material library - Grass V1. Apply to an object of your choice. Using the mapping modifier, scale the map to see all the small noise of the displacement map. Add the B2 displacement modifier: Analytic, ammout to match your scene dimensions, displacement map instanced from Grass V1 diffusion slot (this helps me to see map size in viewport) , 1.0 max error. Scene file linked here with materials and textures.
In the screen-shot below, you can see my settings and the rendered frame.
Render-time: 17 minutes (1-core) isn't great but at least it works:) I have a lot of "hungry" (processor intensive) settings still switched on. Take this scene, tweak the settings, and see what you can do to speed things up and make some observations on how things work together.Tip: This is a "beta" feature, so use it carefully, and avoid of rendering with auto-occlusion or retrace on. - Wild grass
This grass is created with the same procedure as the English lawn. The only real difference is in the mapping. I use different sizes of mapping over the whole surface. The variation in the mapping is shown in the picture bellow. In addition to varying the size, I also add a some slight noise to the texture. - Recent Results:
The lawn in this scene is a combination of both the above mentioned techniques (1. and 2.). The grass was rendered as a separate pass and composited together into the final frame. I have used min/max sample settings of 0/1, which made the grass to look coarser and more realistic (also, this drops the render times considerably).
Other approaches and examples
Here's some other techniques that you might find handy...
- Hair and fur
Benefits: built-in MAX feature, render effect, animatable
Drawbacks: difficult to setup it - ornatrix and hairFX
Benefits: lot of profi tools, nice results, animatable
Drawbacks: commercial plug-in - scatter - geometry
Benefits: looks realistic, built-in standard MAX feature (scatter)
Drawbacks: generates huge amounts of geometry - scatter - opacity mapped
Benefits: looks realistic, built-in standard MAX feature (scatter)
Drawbacks: generates huge amounts of geometry - grass-o-matic
Benefits: easy to setup, nice results, great for foreground
Drawbacks: lots of geometry - Pflow grass
Benefits: N/A
Drawbacks: N/A - GrowFX
Benefits: N/A
Drawbacks: N/A - 2D composite grass
Benefits: realistic look
Drawbacks: 2D technique, stills only - Your tips?
Conclusion:
I will check for your comments -- If you find something better or any improvements, please let me know and I will add it here. I hope this short tutorial proves beneficial and I'm looking forward to seeing your works and advice :)
contributed by Pavel Romsy


