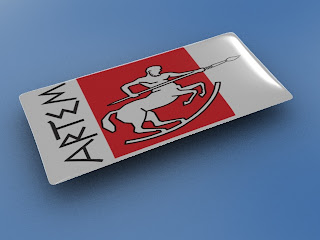
A friend of mine asked me if I could make a "resin dome" type sticker in 3d. The picture below is an example of the kind of sticker I want to create.
Here is start scene made in 3ds MAX8. *start.max*
Start scene
- If you open it, you should see a simple scene with a camera and 2 objects. The top of the object is made from a loft, as I wanted to have a control over shape of the sticker, converted to the editable mesh.
- If you hit render you will get all black because all the lights are switched of by default.
Basic lighting
- Start by adding overall light via basic skylight (min/max aa set to 0/1 to give us some aa and Sky light rate set to 5 for fast preview renders). Render again and the result shows a rectangle with round corners lit with the skylight color.
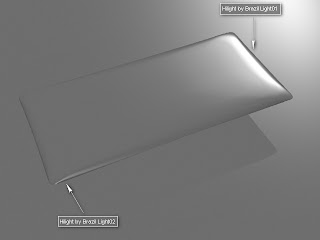
- Now start adding highlights from additional lights. First unhide Brazil Light01 (I have hidden all the additional objects in this scene to make following along easier) with settings like those in the picture below. This light adds a strong specular highlight to the right side of the sticker (also notice that this light is set up to affects Specular only).
- Unhide the last light (Brazil Light02) which adds a specular highlight to the lower left corner. Now, also unhide the ground object.
Click Render, and look at what we have: Our "Sticker" is flying above the ground plane. This is so that we can add some shadow effects in the future. The lighting looks good for now, so next we'll add some materials to the scene.

Materials setup
- Ground plane material: Add a new Brazil Advanced material to the material editor. Set the specular level to 0 and add a noise map into the color (CS) slot. The Noise setting are on shown on the picture below. I wanted only slight gradients.
- Sticker top material: Make a material that simulates resin.
Now adjust the reflection, transparency and other settings to match those in the picture below. Glossy reflections adds nice light blur to all reflections and this effect will make the render more handsome. If the render time on your computer slows down too much, turn the glossy reflections off (for now) and re-enable them again at the end of this turtorial. - Sticker bottom material: Another simple material. Look at the screen-cap below to see what settings we've used. Everything has been left at it's defaults except that we've reduced the specular. We don´t want to bottom part to have any highlights. And also add some picture or logo of your choice. Don´t forget to make this material 2-sided.

Applying HDRI map
- Load HDRI into enviroment.
- Load HDRI into skylight.
- Change the HDRI values. Render image.
Now modify the HDRI setings as shown on the picture below and render again.
- We will reflect some simple geometry with a bright white material on it. Unhide the remaining hidden geometry in the scene (bigwhite and blinds group) and apply a new material to them (details in next step). The scene should look like this:
- The material we want is shown in picture below. It is simple white self ilumination material.
One note.. if your Brazil r/s v2 Advanced Material highlight settings are all 0 (zero), you could change the highlight shader to 'None', which will have the same effect and be slightly (not really noticeably) faster.
The lighting looks better now and we can start to prepare the final image settings.
- Set higher rate for GI and render.
- The render time has increased to 5m48s but there is much less noise now. You can continue raising the rate numbers at the cost of render times, or use the render cache which will gain fast renders with noise reduction. My render-cache tweaks are shown below:
- Render time has dropped back down to a minute and it looks like we're all done. We'll raise the sampling rates a bit more and tweak some more values in render cache, all shown on the screen-cap below. Render.
- Our render time is back up to 3m 20s. As I was hoping for a render time under 2 minutes, we have to change some settings a bit. I disabled auto-oclusion. Render.
Result
Render time: 1m 55s. This is pretty much the quality level I was looking for and the flexibility of the new tools in Brazil 2 has allowed me to reach my desired render time. There is a lot of room for experimentation (for example, different HDRI maps can have a huge effect on the picture). I have done some versions with different HDR's and textures below. Have fun and experiment -- try anything.
I hope that you have enjoyed this tutorial and please excuse me if there are some mistakes:) I expect others out there can find even better settings -- if so, please share :)
The final scene can be downloaded here.


