 Double, double toil and trouble; Fire burn, and cauldron bubble.
A new look at SplutterFish.com and 25% of off Brazil by using the coupon-code, "BOO" !
Also -- Free training videos from MentalBoutMax and SplutterFish, available here.
Friday, October 31, 2008
Happy Halloween from SplutterFish - BOO

Monday, October 20, 2008
New Tutorial -- Render-Cache with Auto Occlusion

New Brazil tutorial From McNeel.com -- This one's Rhino specific, but the same principles apply to Brazil in 3ds Max. This well written tutorial does a nice high-level job of covering how Auto Occlusion works.
Friday, September 19, 2008
The Ghost of Ghost Challenge!
 Remember "Ghost"? For those of you that maybe weren't here when all this GI and "production raytracing" in 3ds Max stuff really started, back in the year 2000, Ghost was the code name of the old pre-alpha versions of Brazil r/s -- Ghost was the first of this new breed of renderer on the scene, was freely available, and the images that 3ds Max artists were suddenly producing rocked the rendering world.
Now SplutterFish has launched an interesting new contest based on the technology level that Ghost was at back in those days.... with over 100 prizes, including $7500 in cash ($2500 Grand Prize!). Check out the rules, read about why we're doing this, and jump on in.
... And yes, you can use Rio :)
Monday, August 4, 2008
"bright needs dark to compliment it"
Another set of examples by Paul Sherstobitoff. [here]
I like the different environments that you can see in these images, and how they affect and compliment the different material setups.
Monday, July 21, 2008
Procedural Marble
 This is a Brazil for Rhino tutorial, but it's got a great conceptual breakdown of the process Brazillian, Paul Sherstobitoff uses to create a really nice looking procedural marble: [here]
Thursday, July 17, 2008
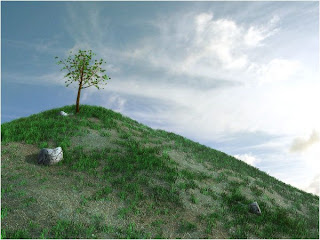
Making Grass with Displacements in Brazil r/s
...What options do we currently have?
For those who are doing ArchViz in Brazil 2, this is a common question. I have seen some nice work using displaced grasses in other renders, so I decided to spend some time exploring different techniques for getting similar results using the currently available versions of Brazil.
Within Brazil r/s, there are two different ways to make displaced grass:
- First approach: Use B2 primitives (sphere & plane), which have good looking, reliable displacements built-in.


Benefits: fast, no errors, nicely looking
Drawbacks: only works on sphere and plane geometry
- Second Approach: Use B2 displacement modifier and apply it to any arbitrary geometry.

Benefits: arbitrary surfaces, more control
Drawbacks: Beta feature, thus not finished and prone to bugs when combined with various other features.

My displacement settings
Currently I build 2 basic types of grass via B2 displacement.
- English lawn

Settings are pretty simple :) I have used my material from the SF Material library - Grass V1. Apply to an object of your choice. Using the mapping modifier, scale the map to see all the small noise of the displacement map. Add the B2 displacement modifier: Analytic, ammout to match your scene dimensions, displacement map instanced from Grass V1 diffusion slot (this helps me to see map size in viewport) , 1.0 max error. Scene file linked here with materials and textures.
In the screen-shot below, you can see my settings and the rendered frame.
Render-time: 17 minutes (1-core) isn't great but at least it works:) I have a lot of "hungry" (processor intensive) settings still switched on. Take this scene, tweak the settings, and see what you can do to speed things up and make some observations on how things work together.Tip: This is a "beta" feature, so use it carefully, and avoid of rendering with auto-occlusion or retrace on. - Wild grass

This grass is created with the same procedure as the English lawn. The only real difference is in the mapping. I use different sizes of mapping over the whole surface. The variation in the mapping is shown in the picture bellow. In addition to varying the size, I also add a some slight noise to the texture.
- Recent Results:

The lawn in this scene is a combination of both the above mentioned techniques (1. and 2.). The grass was rendered as a separate pass and composited together into the final frame. I have used min/max sample settings of 0/1, which made the grass to look coarser and more realistic (also, this drops the render times considerably).


Other approaches and examples
Here's some other techniques that you might find handy...
- Hair and fur

Benefits: built-in MAX feature, render effect, animatable
Drawbacks: difficult to setup it - ornatrix and hairFX

Benefits: lot of profi tools, nice results, animatable
Drawbacks: commercial plug-in - scatter - geometry

Benefits: looks realistic, built-in standard MAX feature (scatter)
Drawbacks: generates huge amounts of geometry - scatter - opacity mapped
Benefits: looks realistic, built-in standard MAX feature (scatter)
Drawbacks: generates huge amounts of geometry - grass-o-matic

Benefits: easy to setup, nice results, great for foreground
Drawbacks: lots of geometry - Pflow grass

Benefits: N/A
Drawbacks: N/A - GrowFX

Benefits: N/A
Drawbacks: N/A - 2D composite grass

Benefits: realistic look
Drawbacks: 2D technique, stills only - Your tips?


Conclusion:
I will check for your comments -- If you find something better or any improvements, please let me know and I will add it here. I hope this short tutorial proves beneficial and I'm looking forward to seeing your works and advice :)
contributed by Pavel Romsy
Wednesday, July 16, 2008
Aren't computers cool?
Here's an image rendered by David Rutten in Brazil for Rhino:
"A little trick, the geometry looks fine in reflection and casts proper shadows. Only Primary Camera rays have been fooled."Too cool not to share.
Next: building grass with B2 displacements
Subscribe to:
Comment Feed (RSS)


